🛠️ Nail every joint like a pro—because your craft deserves perfection.
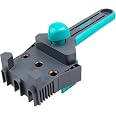
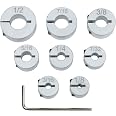
The wolfcraft Dowelmaster is a precision dowel gauge engineered for flawless wood joints including corner, T-butt, and edge-to-edge connections. It supports dowel pins of 6, 8, and 10 mm diameters and works with boards 12–30 mm thick. Featuring tool-free adjustability, integrated stop pins, and durable titanium-finished steel components, it ensures error-free drill hole positioning for professional-grade woodworking.


| Manufacturer | Wolfcraft |
| Part Number | 4640000 |
| Item model number | 4640000 |
| Colour | multicolour |
| Style | Dowelmaster |
| Finish | Titanium |
| Material | Plastic with steel components |
| Item Package Quantity | 1 |
| Number of Pieces | 1 |
| Cutting Diameter | 1 Millimetres |
| Included Components | 1 dowelmaster |
| Batteries included? | No |
| Batteries Required? | No |
| Battery description | Not Included |
| Assembled Diameter | 1 Millimetres |
| Item Weight | 9.98 g |
A**R
Costs a bit more but it’s worth it.
Arrived very quickly appears well made. Bought during spring deals so the price brought it inline with the cheaper kits (£12). The only problem is you do not get depth stops and drills which cost another £10. I still think it is worth the extra cost as the drill hole are lined with nice metal and the drill bit you buy will be better quality. I have had a few practice goes with it and have been very pleased with the results.
A**A
Life saver !
Great product and came as described. It works perfectly and made my life easier.
M**.
Very useful jig
For £18 I figured I couldn't go far wrong with this jig. It's surprisingly accurate and easy to use, just make sure you read the instructions and watch the plentiful videos available on using it. Once you get your head around its features and operation it's really nice to use. Make sure you pay attention to the drill depths for different types of joint (all explained in the manual) to avoid drilling holes too deep. It's a pity the guide didn't come with any depth stops but they're available separately. I would suggest getting the clamp style depth stops rather than the slide/screw depth stops as they look more substantial and less likely to slip. Personally, I use masking tape on the drills, reserving the depth stops for really precise work.In use I found the drill guides well formed and accurate. Clamping the work piece is advised. The jig handle can interfere with clamps in certain configurations, but nothing that can't be fixed by moving the clamps. I did notice the jig cannot drill holes extremely close to the edge of the wood, so this jig isn't for you if you want dowels closer than 35-40mm from the edge. This is due to the placement of the moulded pins of the jig.Using the jig I quickly used it to put together an Xmas tree base cover that can be dismantled for storage (limited storage space). The end result was excellent and quickly achieved, with the short end of the dowels glued in place and the long ends slotting into place to hold it together over Xmas periods. Overall I recommend this dowel jig to anyone with a need to use dowels occasionally.
M**E
Better way to use this jig?
Several reviewers have commented that it is difficult to hold this jig steady especially when doing the first drilling into the end of your wood or panel. Several complaints about the jig moving slightly and the dowels not being quite vertical. The trouble is we might have been watching the wrong You Tube video, the English version where you clamp the wood vertically and try to drill down for into the wood while trying to hold the jig firm and steady at the same time which is very difficult. By accident I came across a Spanish video where the wood is clamped horizontally or at a slight upward slope towards the user and then you drill from the front. Assuming most of us are using the 8 mm dowels you can now use your weight pushing down on the handle of the jig and at the same time pushing forward with your thumb to keep the jig pressed squarely and firmly against the edge the the edge of the wood. You are also drilling forward which is slightly more comfortable than drilling down. Try this method and see what you think - I am sure like me you will find it to be a better and easier way. EDIT : having used this jig quite extensively on 18 mm melamine faced boards to make kitchen units here are my further comments. The first picture shows my inclined workmate raised about 2 inches at the front. This was easier than making an inclined ramp on my fixed workbench. It is weighted down by a heavy tool box which is also pushed hard up against a scrap piece of MDF to make the workmate really firm and solid. The MDF is just hung on the the workmate frame with a couple of cup hooks and is easily removable. The second picture shows me using the dowelmaster. You will see that I am not only bearing down on the handle to make sure the dowel enters the centre of the panel but also pushing with my thumb to make sure the jig remains square on to the board. The drill is a very old 300 watt Black & Decker which is not too heavy and does the job fine. You will notice it will be easier to remove build of wood chips when you are drilling your 28 mm hole as the exit path for the chippings is now almost horizontal rather than being vertical. The blue pads off cuts of these silicone type non slip mats. Even with strong clamps I found that because the melamine surface is so slippy there was a tendency for the board to move when pushing hard on the drill. The last picture is a few tips which you might find useful. I had to think of some easy way to provide depth stops to drill 28 mm into edges but only 14 mm into faces of boards. In my odds and end boxes I came across these black nylon spacers which were unused bits from fixing a wall mounted TV bracket and they have a 8 mm hole. The larger ones are 15 mm high and the smaller ones are 5 mm high. Using steel washers as well I can make up any length drill stop. The red one I use for drilling 28 mm edge holes and I just add the blue one to it as well to reduce the drilling depth to 14 mm for face drilling. The adavantage of these spacers are that they are very cheap and the nylon will not cause any wear on your jig. The other thing I noticed is that when the spacer stops spinning you have drilled down to the correct depth! You might be wondering why there is a piece of green and yellow earthing tape stuck on the top corner of the jig. Well I noticed that this angle was almost exactly over where the dowel hole is made in the edge. So if you want to be more precise where you put your dowel holes then just line up the middle green line over where you want your dowel! I was not impressed with the video recommending that you move the board 40 mm, using a ruler, when making T joints. I could see looking down the holes that I was a little bit out. I decided to use instead to use the raised edge on the side of the dowel master. The trouble is that it is grey plastic on grey plastic so not easy to line up. Just rub the edge with white chalk and blow off the excess and now makes lining up really easy. Last thing. I strongly recommend the 50 mm long confirmat screws in between your dowels if you can't glue your joints, which you can't easily do with melamine boards.
Trustpilot
3 days ago
2 months ago